

Fermentation and is over and it is now time to switch into bottling home brew beer mode. The bottling stage is just as important as the brewing and fermentation stage when it comes to ensuring the quality of your beer is top-notch.
In today’s post I will walk your through the complete bottling process. We will look at all aspects of bottling day to include:

- When you should bottle
- Which beer bottles to use
- How to clean and sanitize your bottles to ensure your do not get an infected batch.
- The equipment you will need
- What priming sugar your should use (I give your 2 options)
- And we will walk through the step by step process of how to bottle your brew.
So let’s get at it…
When to Bottle Home Brew
First off when is the correct time to bottle your homebrew?
Obviously you would think the answer is when fermentation is over. And the answer to that is yes and no.
For me I actually prefer to let the beer age and condition in the fermenter for a while after fermentation has completed. I find this creates a better tasting beer in the end.
So what I do is I leave the beer in the fermenter for at least two weeks. Sometimes even longer but no longer than 4 weeks. I find 2 weeks works well for me. Fermentation has completed typically after 5-7 days; and the extra week in the fermenter allows it to condition awhile.
However you can bottle it as soon as fermentation has ended.
How do you know when the fermentation has ended?
It is when one of the following things has occurred:
- Using your hydrometer take a gravity reading. Once the final gravity has been reached as per the recipe the beer has finished fermenting. Yes in theory the gravity could in fact go lower depending on how you brewed the beer, so you could check a day or two later, and if the gravity has remained the same it has finished the fermentation process.
- And as just stated, instead of waiting for the final gravity to be reached. After 4 or 5 days you can take a gravity reading with your hydrometer and if the gravity has not moved over the course of 2-3 days it has finished fermenting.
But again I do recommend even if the final gravity has been reached that you let the beer sit in the fermenter awhile longer. Now of course your dry hopping schedule is going to affect how long you leave the beer in the fermenter, as you do not want to leave it sitting on the hops for longer than the recipe calls for as you will end up with a grassy off flavor in your beer.
Alright so there you have it 3 ways to know when to start bottling that brew up… next we will take a look at which bottles you should use.
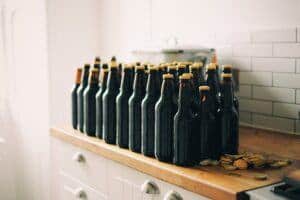
Which Beer Bottles Should You Use?
When it comes to the bottles you can use you really have two options. Either plastic or glass.
I really do not have preference between the two. I have found no difference in flavor if you use plastic versus glass.

Now I personally do not like the smaller glass bottles that most commercial beers come in; simply because they are so small which results in you having to use more bottles, which makes for more work and takes longer.
Personally I like either the 1 liter plastic bottles or the 1 liter glass swing top bottles. Using the 1 liter bottles means you need less of them, so the bottling process goes quicker.
Plus when I drink a beer I always drink at least 1 liter so it works well for me.
Now having said that you can get the glass swing tops in 750ml size also and the plastic bottles also come in 500 ml & 750 ml size.
So let’s take a look at your options:
Option #1: First the glass bottles that the commercial breweries use, you can simply have ask your friends to hold onto their empties for you. Or pick some up on Amazon here.
If you go this route you will need bottle caps and a capping machine.
You can get bottle caps here <= Click there
And on this page there is a capping machine that gets good reviews. <= Click there
Option #2: As indicated, I enjoy the swing top bottles, they are easy to cap and no need to replace the caps as the swing top caps last a long time.
Click here to get swing top bottles
Option #3: Thirdly when it comes to the plastic bottles, Coopers DIY makes the best Plastic PETA bottles I have ever used.
You can click here to get some, along with the covers.
Clean Beer Bottles Home Brewing
Alright so your have your beer bottles and are ready to roll. The first step is to give them a good cleaning.
Cleaning is straight forward and needs to be done every time you bottle up a new batch.
Cleaning actually starts as soon as you pour the homebrew in your mug. I always take the now empty bottle to the sink and give it a good rinse, this makes sure that none of the left over trub etc. is given time to dry up and cake on the inside of the bottle.
When it comes to bottling day what I recommend you do is take a bucket or even better a big Rubbermaid container; fill it with warm water and a cleaning agent and let the bottles soak in this solution for at least ten minutes.
There are only two cleaning agents I use and as such recommend…
They are:
1) PBW (Powered Brewery Wash). This is the best stuff going for cleaning your brewing gear. It is made specifically for brewing.
2) Oxi Clean. Yes this is the stuff your wife uses at home. It works well for cleaning your brewing gear and is a little bit less costly than PBW. Make sure you get the unscented Oxi Clean.
Click here to get some Oxi Clean
After you have soaked your bottles, take a wire brush designed for bottles and clean out any remaining debris. With plastic bottles go very gently with the brush as you do not want to scratch the bottles.
I also throw my bottle caps into the solution with the bottles and let them soak also.
And that is it for cleaning… the next step which is as important as cleaning is of course sanitizing.
Sanitize Beer Bottles Home Brewing
The next step in the process of getting your bottles ready to receive the brew is to sanitize.
If you have been following this blog you know I am a sanitizing freak. There is nothing worse than losing a batch of homebrew because
Be diligent with your sanitizing and you will be OK.
For your bottles do the same thing you did with cleaning them (do not use brush at this point). Fill up your bucket or Rubbermaid with water and StarSan and let your bottles and caps soak in them.
I also put my bottling wand and transfer hose into soak as well (we will talk about the wand and hose in the next section).
StarSan is a no rinse food grade sanitizer and it rocks. If you follow the dosage instructions on the bottle you do not even have to rinse the sanitizer out of the bottles. Sanitize and go.
I always keep a spray bottle of this stuff nearby when I am brewing.
You can learn more about it and even get yourself a bottle of it by Clicking Here
How to Bottle Your Homebrew
Before we get into the equipment you require and the priming sugar you will need; we are going to look at the step by step process of bottling.
The reason for this is that there are two methods of bottling home brew beer we are going to look at. Both methods work great and both produce excellent carbonation.
The choice is yours:
Method #1: Quick & Easy.
This method is the simplest of the two, (although both are simple).
With this method all you need is to pick up some Coopers Carbonation Drops. These things are awesome and a big time saver.
They basically look like a clear piece of candy; and in reality that is what they are. They are pieces of sugar about the size of a hard candy you would get at Halloween.
The basics of priming with them is you drop one into your cleaned and sanitized bottle and then your fill the bottle up with the homebrew; put the cover on and your are done. Quick and Easy.
The following are the more detailed instructions:
1) If you are using 500 ml bottles your will use 1 Coopers Carbonation Drop. If you are using 750 ml or 1 liter bottles your will use 2.
2) After you have cleaned and sanitized your bottle put the 1 – 2 drops into the bottle.
3) Using a bottling wand or a transfer hose fill up your bottles.
4) When filling up your bottles do not let the homebrew splash around. Put the wand or hose all the way on the bottom of the bottle.
5) Fill the bottle up to about an inch from the top. This allows room for the gas that will form from carbonating.
6) Put the now bottled homebrew way in a room temperature room for at least two weeks to carbonate. Longer is always better.
7) The day before drinking the brew put it in the fridge for 24 hours to chill.
8) Drink and Enjoy!
Method #2: The Traditional Method
The traditional method of bottling the brew works just as good as method #1, and it really is not that much longer of a process.
Here is the basics of this method. You will transfer the wort from the fermenter into a new bucket. You will add priming sugar that has been dissolved in hot water to the bucket. You will gently stir the mixture. You will then transfer the mixture (beer with sugar added) to the bottles. Cap the bottles and your’re done.
Here are the more detailed instructions for this method:
1) You will require a bottling bucket. A 5 gallon pail will work fine. Click Here to check out a bottling bucket.
2) Clean and sanitize the bucket.
3) Using a transfer hose (line), you will carefully and without splashing transfer the wort from your fermenter into the bucket. Make sure the hose is on the bottom of the bucket so it does not splash around and get oxygen in your beer.
4) Heat up to boiling 2 – 3 cups of water on the stove.
5) Add your priming sugar to the hot water. For a 5 gallon batch you would use ¾ a cup of corn sugar (dextrose). Or 2/3 a cup of table sugar will also work. Stir the mixture until the sugar is dissolved.
6) Pour the sugar mixture into the bottling bucket. Gently and slowly stir the beer and sugar mixture in the bucket.
7) Using a siphon with transfer hose and bottling wand connected to it; transfer the beer into the bottles. Again leaving about one inch of head space.
8) Cap the bottles and put them away for at least two weeks in a room. Keep the temperature at room temperature.
9) Put in fridge for 24 hours prior to drinking.
10) Drink and Enjoy!
The Equipment & Ingredients You Need
The following is everything you need to bottle your home brew
Cleaning and Sanitizing:
Click here for PBW & Oxi Clean
Equipment:
Bottling Wand => You can get one Here
Transfer Hose => You can get one Here
Siphon (if your fermenter does not have a spigot on bottom of it) => Get one Here
Bottles => You can see all of Your options by Clicking Here
Capping Machine (if you are using traditional glass bottles) => Go here to see the one I recommend
Ingredients:
Click here for Coopers Carbonation Drops
Click here for Corn Sugar (Dextrose)
To Wrap it Up
I trust you enjoyed this tutorial on Bottling Home Brew Beer. As you can see it is a pretty straight forward process.
Most brewers start out bottling and then move to kegging. Kegging is easier and more convenient for sure and I do package most of my brews in kegs. However, Bottled beer or naturally carbonated beer in my opinion taste much better. So even when I keg I still bottle at least 2 – 3 bottles per batch. Always nice to have on hand.
You can learn about kegging here.
Also if you are new to homebrewing be sure to check out our post on how to home brew. It covers everything you need to know about this great hobby.
If your have any questions feel free to drop the into the comment section below. I will be more than happy to help your out.
Cheers… Big Robb is out.