

Welcome to my Brewers Edge Mash and Boil review…
I’m pretty stoked to do this review, because I really do love this little magic beer making beast of a system!
Why do I love it you might ask? Well for a whole host of reasons that I will cover in this post; but the first reason being that this little bad boy was my first electric system I ever brewed on and she and I have brewed up a boat load of home brew together and she has never let me down even one time…
The Mash & Boil works great… it is cheap as hell to buy… it make great beer… it is super freaking easy to clean…. and it is compact and small enough that you can take it anywhere you wish to go to fire up a good ol’ brew day.
So now you have a choice…
…you can continue reading my top notch highly entertaining brewers edge mash and boil review below that is definitely going to convince you that you want and actually need this unit…
…or you can skip my babblings and order one for yourself by Clicking Here and get right to brewing up some bad ass brews…
Before Reading the Post Check Out y Quick Review of the M&B
Why I Started Using The Mash and Boil
Still here? OK good stuff then let me woo you with my love of this electric brewing beast…
Soooo…. when I decided it was time to up my game and move from beer kits and partial mash brewing into all grain brewing… and after a shite ton of research I decided to go with the Brew in a Bag method of making beer.
If you have spent any time on this site at all you will see that I’m a huge brew in a bag fanatic…

To be very upfront I started brewing this way not because I researched that it was the best way to brew (I now believe it is)… But because brewing in a bag was so much less expensive than any other all grain method out there… it was all about the benjamins for this guy when I was starting brewing…
…How could I make great tasting all grain beer as cheaply as possible!
And once I got started brewing this way and saw all the crazy convoluted things other brewers were doing to make beer with their 3 vessel systems… it really blew my mind that everyone else did not brew this way and I really became a fanatical fan of brew in a bag.
The advantages are huge:
- Low low low equipment cost to get started
- Ease of brewing (so simple)
- Clean up was a quick and easy. (a fraction of the time)
- You could brew anywhere. Take your little bit of gear to your buddies garage, or out on your deck, etc. Try that with a 3 vessel system.
- And the beer turned out great.
So I was hooked…
The only down fall was that I live in Canada and with the BIAB system I had I was brewing outside because it was a propane gas system. Which as you can imagine brewing outside becomes somewhat of a pain in the arse and a wee bit of challenge when the snow flies… (or its raining)
So I started looking into the electric all in one brewing systems… which as I am sure you are aware are fancied up versions of brew in a bag.
They are the Exact same thing as my BIAB set up… except they use electricity(plug them into the wall) and they use a grain basket (malt pipe for the fancy people) instead of a brew bag…
Tip For You => If you end up buying one for yourself, consider picking yourself up a brew bag. I still use the bag instead of the basket as I find it gives you a higher efficiency.
So I started my research into which all in one brewing system I should get…
Remember Why I Got Into BIAB Brewing?
Keep in mind that I was cheap and it was the Low Cost that hooked me…
Same thing happened with the Brewers Edge Mash and Boil (M&B)…
The other all-in-one brewing systems I looked at were definitely more expensive and in some cases insanely more expensive.

The closest system in price to the M&B was at least $150 more and in some cases as I mentioned some of the systems were thousands of dollars more…. (which is simply stupid!)
So needless to say the MAJOR difference in price intrigued me and got my attention…
I also had a buddy brewing on this system and he loved it and made great beer… I took a quick look at some of the other reviews online and they were all positive so I rolled the dice and coughed up the moo-la and ordered myself one. I got mine from Williams Brewing.
And I have not looked back… it has been a ton of fun to brew on, easy to use and as I have said it has made great tasting beer.
Heard Enough? Ready to Order Your Own? Click Here to Get Yours Today
What Accessories Come With It?
I realize that you may not be like me (probably a good thing) and just hearing that it is inexpensive, great quality and makes great beer is not enough for you and I understand that no product review is complete without a look at the features and more importantly the benefits…
And this would probably be the shittiest brewers edge mash and boil review ever if I did not provide you at least a brief overview of the system and its accessories…
If I’m wrong and you are ready to order one up you can do so at one of the following locations:
OK let’s keep going and take a quick deep dive into the unit itself…
Deep Dive Item #1: 120V Power – So the unit runs on 120V power.
What does that mean? It means you can plug it into a standard electrical outlet in North America. Which is a freaking a great thing.
=> No control panels.
=> No 240V adapter required.
=> No need to rewire your brew room.
=> Take the unit and place it where ever you want to brew and plug it into the wall.
They do say not to use an extension cord… they want you to plug the M&B cord directly into the electrical outlet on your wall. Apparently using an extension cord could cause a fire. And fire as we know can be bad.
Now having said that I have used an extension cord a few times ( I know smart like dump truck) and had no issues at all… HOWEVER I take no responsibility if you use an extension cord and burn your place down. Follow the directions from Brewers Edge and do NOT use an extension cord! 🙂
Some people who have never used the unit will whine and complain that 120V heats the water to slowly or does not create a strong boil. What do I think about that?
For the price savings of $150 – $2000… well I have zero problem waiting the extra 15 -20 mins for the water to heat. And the Boil is perfect in my opinion. A nice rolling boil in my experience is better then a violent boil is exactly what you want!
Tip For You => Although I never did this, my buddy did and he reports it made a big difference in the units heat retention… It heated the water up faster and maintained its heat even better during the mash. He wrapped his unit (to insulate it) with hot water tank insulation.
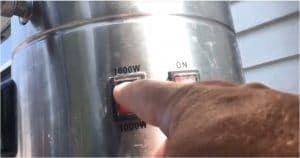
Deep Dive Item #2: Two Heating Elements – This unit comes with two heating elements. What does this mean? It means you have two levels of heating a 1000W and a 1600W.
So what does this mean for you? What is the benefit?
Well… It means you won’t burn the crap out of your grains during mash. It means you won’t be going crazy with fluctuating mash temperatures. It regulates the temperature in the unit very nicely.
You use the 1600w to get to your mash temp and you use it to boil. You use the 1000W to keep your temperature at your mash temp.
The unit does a great job of keeping your mash temperature where it should be. Which to you means you will make good beer every time.
Deep Dive Item #3: Build Quality – We have all heard the old saying “You Get What You Pay For”… which is supposed to mean that if you buy a cheap product you will get a cheap crappy product.
Well this little sweetie proves this quote is dead wrong…
The build quality of this unit is very impressive… It does not look or act like an inexpensive unit. It looks and feels like it would cost as much as the more expensive all in one systems.
Everything on it is of good quality:
- The welds are clean
- There are no sharp edges
- Everything fits together nicely
- The finishing on it is excellent
- The unit looks nice and operates perfectly.
It definitely debunks the myth that you can judge an item by its price tag!
Deep Dive Item #4: Grain Basket (Malt Pipe) – The unit comes with a very sturdy grain basket.
The basket fits and sits inside the unit. It is where you put your grains for mashing.

To sparge you simply raise the basket out of the wort and it sits nicely on top of the unit; the wort drains out perfectly. Which is cool as you do not have to hold it there while it drains, which leaves your hands free to perform a rinse sparge of sorts (by pouring water through the grains).
Tip For You => It is not required to pour water through the grain bed. Some people do this and report a higher efficiency. I have noticed a small increase in efficiency. So it depends on what mood I am in (or how many brews I have consumed) whether or not I do this.
Tip For You => As indicated previously, I do still use a brew bag from The Brew Bag instead of the Brew Basket from time to time when I 
Deep Dive Item #5: It has Handles – Yup freaking handles man!
Sometimes in life it is the little things that really matter… and this is one of those little things in life that really matter! 🙂
This unit has welded-on very strong handles on both sides. This makes carrying the Mash & Boil very easy. Not just before and after brew day, but I have even moved it with liquid inside (obviously not recommended)! The handles are strong and very convenient.
Heard enough yet my friend? Ready to grab yours? Ya.. then get at’er…
=> Ready to get Brewing? Order Your Own System today by Clicking Here:
Deep Dive Item #6: Double Freaking Walls – The main body of the unit itself is double walled.
This does a few very cool things:
- It allows you to relax, put your feet up and drink a few brews during the mash. Because you do not have to worry about your mash temperature fluctuating; as the double walls keep the temperature nice and steady.
- It allows for a very nice rolling boil. I have always preferred a rolling boil when brewing over a crazy violent bubbling all over the place boil. I find the boil from the M&B to be very satisfying!
- And last but certainly not least… as they say safety first… the double wall of the unit prevents you from burning your hands off if you accidentally touch the side of it while you are boiling. Which lets admit does happen from time to time. You can safely touch the unit during a boil; it is warm to the touch but not scorching hot.
Deep Dive Item #7: Ease of Use – I am not a complicated guy. I like to turn something on and let it do its thing. Too much complexity and I am out!
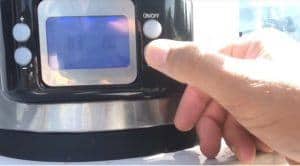
The control panel on this system fits the bill for me perfectly. It has nice little + / – buttons to increase or decrease temperature. Can’t get much simpler then that!
It also has a timer you can set that will allow you to start heating up the water without you being there. How freaking cool is that. I decide I am going to brew tonight. I set the timer to come on to heat the water while I am driving home from work, the brew day has already started and I can get the mash going. Saving time on brew day is always a bonus for this cat.
Deep Dive Item #8: Barbed Spigot Valve – Nothing crazy fancy here. But it comes with a barbed spigot valve at the bottom that fits a silicon liquid line perfectly.
Great for chilling, and transferring the wort or recirculating your mash.
Deep Dive Item #9: It’s a Fermenter to? – Say what??
Now full disclaimer… this option is New & Very Very Cool… But where it is new it did not come with my unit and I have never used it has a fermenter.
The geniuses at Brewers Edge have developed a distilling / fermenting lid that fits on top of the unit itself and converts it into a fermenter.
How cool is that… a brewing system and a fermenter built into one. A nice cost savings and also a space saving bonus! No need for another vessel to ferment in! I like it!
Obviously once you are done brewing you will need to clean and sanitize the crap out of the system before adding the wort back in to ferment.
OK enough of all the good stuff… obviously I really dig this system… but what about the draw backs… are there any and are they a big deal?
Read on…
Draw Backs of the Mash and Boil
If I am going to do an honest brewers edge mash and boil review I have to say there are two draw backs…
…nothing major and not a game changer by any means, especially for the price. But nonetheless if I were an engineer (which I am clearly not), I would try to whip up a solution to nix these two minor draw backs in the butt:
Draw Back #1 – The unit does not have a pump to recirculate the wort. (see note below, it apparently now does)
Some of the more expensive all-in-one units have a pump connected to the spigot at the bottom or something similar, that allows the wort to recirculate during the mash.
This allegedly increases your efficiency.
Maybe it does maybe it does not… one thing I can tell you is that if it does it is not by much… AND there is a $10 solution… pick up a big arse Spoon and a Water pitcher…
…. 3 or 4 times during the mash pour some wort through the spigot into the pitcher and slowly pour it back into the top of the unit… and then stir the grains.
So instead of spending hundreds or thousands more on a more expensive unit that has a pump… I preferred to spend an extra $10 on a water pitcher! Call me crazy I don’t know! 🙂
Tip For You => If you are concerned about having a recirculating pump, don’t be crazy and buy a more expensive unit. Simply buy a freaking little pump for $30… Get some silicon liquid beer line and hook it up to the unit. Bam you have a recirculating pump for a fraction of the price. My same buddy who insulated his unit also did this. If you order the M&B and want to set up a pump, comment below and I will send you videos of him using the pump he jerry-rigged himself.
NOTE: It has been brought to my attention that the mad scientists from Brewers Edge have NOW added an option to add a recirculating pump! Bam there it is. If you think you need a pump order the unit that comes with it!
Draw Back #2 – and this is really not so much of a draw back because all of the systems are going to have issues like this.
The temperature sensor is located at the bottom of the inside of the unit. If you spill grains out of the basket (malt pipe) during the mash, they can scorch on the bottom. Which can create a hot spot and the sensor will shut off the elements and give you an ER4 error message.
Again all of the all-in-one brewing systems will have their own individual issues surrounding the location of their sensor code.
This is not a big problem… the take away AKA the lesson if you are taking notes is… Do NOT spill grains into the unit… Keep them in the grain basket or brew bag where they belong and you will be all good!
Final Thoughts
I hope you enjoyed and found my brewers edge mash and boil review helpful.
If you have any questions about the unit, by all means comment below and I will be sure to respond to you right away.
As you can tell I am a big fan and have no problem recommending this unit to you. I have recommended it to many other people who have purchased it and not one has complained or bitched at me after they bought it.
In the end it is a great way to get into all grain brewing… it has a price point that simply cannot be beat… it makes incredible beer… it is simple to use… easy to transport… easy to store away between brew days… all in all a winner.
What are you waiting for, Order Your Own today, Click Here:
Let me know if you picked it up… always fun to meet another fan of this beast.
Cheers
Big Robb is out!
Making my own beer is something I was thinking for a long time. I have checked many articles in the past but for whatever reason I never decided to give it a try. it seems like a funny thing to do when chilling out with your buddies and reading your article gave me second thoughts about giving it a shot this time. Thanks for the detailed article and for all the information you provided in it.
Right on man, glad to help! It’s a great hobby!
Hi there Big Robb,
Thanks for providing this review of the Brewers Edge Mash and Boil, my friend has recently started up their own catering company and one of the ideas he wanted to explore is brewing his own beer to offer alongside the food. Would you say that this beer making system is a good “practice one” so he can begin to get to grips with brewing?
Hi Nate… it is definitely a good practice unit. It would not be large enough for a commercial system. But the principals for brewing would be the same for sure. I owned a small micro brewery and would be happy to point your friend in the right direct equipment wise for what he would need. Cheers man
I’m always on the look out for different gadgets and in this case, I will say I’m not a big drinker. I have never brewed beer in my life but I have a sister that does. I have watched and sampled the finished product. I’m keen to introduce her to your product, if its cheap and delivers the goods, its going to be a winner!
Right on Derek. If she has any questions have her drop a comment on this page, happy to help. I’m positive she will enjoy the Mash and Boil. Cheers
Well I live in Wales, and a handful of my friends have been into brewing beer for a number of years now…but it seems to be a bit of a mission impossible whenever I check out their systems. More often than not – it looks like they’re in the middle of some sort of chemistry experiment.
This has always put me off, but the Edge Mash and Boil seems to be ‘idiot proof’, even for someone like me. I’m wondering how long it actually takes to make/brew the beer in this device?
Hey Chris… great question man… brew day would be about 4 – 5 hours. There is a major time savings with an all in one system like this due to all of the brewing being done in the one unit verses having to transfer between units. Plus cleaning is a snap which is always a bonus! Cheers man
Hey Rob. Loved the article. I’ve never used Mash&Boil; before but this amazing small brewing machine definitely looks promising. You’ve really went into all the details when it comes to this beer making wonder.
I know use a bigger brewing system in my basement. I’ve constructed it myself and it has not let me down since.
My cousin is very interested in getting his first brewing machine and I think Mash and Boil just might be the perfect choice for him. Really easy to use, decent capacity, handles on both sides and good build quality. All of these are good enough for me.
I am going on Amazon and grabbing one for my cousin.
Thank you.
Strahinja
Right on Stranhinja glad the article helped out. I’ve brewed on 7 bbl, 2bbl and small systems like the mash and boil and this little beast keeps up to the rest! your cousin will enjoy! Cheers man.
Thanks for the review. I am mostly sold on this unit for quality AND price but would choose the integrated pump model for $50 more. I simply don’t see $20 more than the separate pump you mentioned to be a big difference.
Your welcome Dan and I agree with you. Let me know how you make out. Cheers
This system appeals to me b/c of the price and that it will allow me to do small 2 1/2 gallon batches. I currently brew all grain using two 2 gallon water tanks that I have converted into a mash tun and a hot liquor tank. After an hour in the mash tun, I begin emptying out the wort slowly into the boil kettle. At the same time I fly sparge into the mash tun from the hot liquor tank at about the same rate as the mash tun is emptying into the kettle (at least that is the goal). I end up with enough wort to have about two gallons to ferment after boiling. It sounds like with this system their really isn’t any sparging done? I am assuming you would have to begin with enough water so that you will have enough wort to ferment after the boil?
Hey Chris, you can dunk sparge or simply pour hot water through the grain basket, some what of a rinse sparge. The later is what I typically do, I run enough water through the grain bed to bring the liquid in the kettle up to the level I want preboil. Great system. Hope that helps. Cheers
Have had my Brewers Edge for a little over a year and have made 14 all-grain batches with it. It’s a nice unit, but I’m very careful with my grain, never spill any from the basket and even bag rice solids and hops, none of which prevents me from getting an e4 error every single batch. Sometimes it occurs during the mash, sometimes during the boil, but it’s a guarantee. I’m always shooting for brews in the 4.25 – 4.5 abv range, so my grain bill is never more than 10 lbs and I don’t add any extracts. I’ve also tried only using the 1000w setting throughout the entire process and that doesn’t seem to help with the e4 code. I’d love it to work properly just once, but have tried everything (including adding a circulation pump) and am running out of ideas to try. Seems like the unit would benefit from a thicker bottom or wider gap between the element and bottom of the interior, but that’s not been something I can engineer a fix for. Any ideas would be greatly appreciated.
Hi Patrick, yes that happened to me; contact the company they will send you a new part to replace (forget what it is at the moment), and tell them about the e4 error. I replaced it, and it has worked great for quite a few years since. Good luck!