

Brew day is done, the excitement of watching your beer bubble away as it ferments has ended and now it is time to get to work and bottle
No question that some might find bottling the tedious part of the brewing process. But it is a crucial part obviously.
Before I get into these 9 tips let me say that if you are sick of bottling and want to get into kegging your beer I feel ya… I personally do both and in my books they both have plus and negatives associated with them.
It might be a surprise to some people but I prefer bottled homebrew over kegged beer. It just has a fuller more natural taste in my opinion, but I can’t argue with the fact that bottling does take more effort and time.
Typically, what I do now is brew a larger batch, big enough that I can bottle about 3-4 liters along with kegging 19 – 20 liters. This way I get the best of both worlds. The easy of kegging most of the batch and the novelty of having a few liters of bottle homebrew.
If you want to learn how to keg you can check this post out by clicking here.
OK let’s get into it… believe it or not there is somewhat of what you might call an art to bottling your brews. And obviously it is crucial that you understand how to do it the right way or you are wasting your time, money and energy.
Below I am going to give you 7 tips to make sure you do this important part of the process correctly; however I would also recommend that you check out my complete tutorial on how to bottle your beer. I walk you through step by step how to do it correctly.
Click her for my how to bottle homebrew post.
Alright let’s get into these 7 tips:
#1) Inspect Your Bottles. Have they been cleaned and sanitized? It is easy to forget whether or not you have especially if you are cleaning and sanitizing them after their previous use and not directly before bottling day. So my advice is after you drink the beer rinse the bottle immediately.
Then as part of bottling day, soak them in PBW (my favor cleaning agent, I also use Oxi Clean) to get any left over residue out of them, give them a good rinse and than soak them in StarSan (the only sanitizer I ever use or recommend) and rinse. And now you know you are good to go and have no concerns about infections and off flavors.
Also, part of inspecting them would be to make sure they are not chipped or cracked. You don’t want to use any damaged bottles. If the bottle is chipped throw it out, CO2 can leak out and the beer will be flat if you don’t.
#2) Get a Bottle Brush. These little buggers can make your life much easier. Sometimes stuff just gets built up and will need a little scrubbing to break it loose. Be sure to sanitize the bottles after using the brush.
#3) Use Fining Agents. AKA clear your beer. When you clear the beer and use fining agents you are leaving much of the sediment behind when you go to bottle your homebrew.
I personally do not like floaties in my beer and by using fining agents and clearing your beer you are reducing the amount of sediment that will be in your bottle.
If done right this will reduce the floaties significantly. Plus less sediment means less mess to clean out of the bottle. Check out this post to learn how to clear your beer.
#4) Use Carbonation Drop. When it comes to priming your beer I am a huge fan of Coopers Carbonation Drops. If you do not know what they are, they basically look like a little sugar candy and that really is what they are.
So instead of using dextrose and batch carbonating you simply add one of these little sugar candies to each bottle.
Using these reduce the chance you mess up the carbonation by adding too much or too little sugar. Too much priming sugar and bottles can explode on you during carbonating and too little and the beer is flat. These drops give you the perfect amount of required carbonation.
Plus these drops reduce the time it takes to add granulated sugar or dextrose on bottling day. Always a bonus to be able to cut some time out of the process. Coopers and Mutons both have carbonation drops. I have had better luck with the coopers drops.
#5) Use Swing Top or Screw on Caps. Instead of using the traditional bottles get rid of them and the tedious process of using a bottle capper.
Instead invest in either Swing Top or Screw on Top bottles. I prefer the Swing Top as they are glass bottles but I have lots of the plastic screw on cap bottles and they work just as great.
These in my opinion are far superior than the traditional bottles that require you to use a capping machine for the simple fact that you do not need to use a capping machine with them, which reduces your cost and time and effort.
Do still keep an eye on the caps, make sure they are not getting too old and losing their seal. Both the swing tops and screw on tops are easy to replace. You can find new ones all over the place at any of the online brew stores and Amazon carries them also.
#6) Make Sure Your Caps are Absorbing Bottle Caps. This is even more important if you plan on storing your bottles for any significant period of time.
And I always recommend storing the homebrew for at least a month if not longer before drinking it. The majority of beers do better with age. I completely understand and appreciate how difficult it is to wait to break into your beer. We all want to take that first drink of the beer we made. But if you can wait and be patient your beer will thank you and so will your taste buds.
If you are using the screw on or swing caps they will be Absorbing caps.
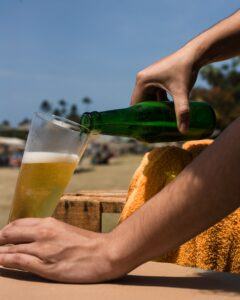
#7) Don’t Splash Around. You need a bottling wand. Do not allow the beer to splash around as you are filling the bottle. The splashing creates oxygen and you want to reduce the amount oxygen you allow to get into the bottle.
Oxygen can create off flavors that you want to avoid. The bottling wand sits on the bottom of the bottle and as you push the bottle upwards it allows the beer to flow into the bottle in a controlled fashion.
#8) Give An Inch. In this case it is not give an inch but rather leave an inch. You want to leave an inch of space in the bottle between the level of beer and the top of the bottle.
What happens when you add the sugar to the beer is that it brings some of the yeast still in suspension in the brew back to life and as the yeast eats this new sugar it creates which creates carbonation.
So you require the space at the top of the bottle for the CO2 to build up. If you do not leave enough space it could result in you having bottles explode. Never a good thing.
#9) Room Temperature. After you have finished bottling put the filled bottles away to carbonate in a room that is set at room temperature.
Do not over think this but a room that’s temperature is between 60 – 70 degrees Fahrenheit will work great. You just do not want the room to be to hot as it can create off flavors and you do not the room to be too cold as it can put the yeast back to sleep which will result in under carbonation.
Also I like putting them in a dark space, so that the light does not spoil the brew. This would be especially important if you are using green or clear bottles.
Over To You
And that is it my brewing friend. I trust you enjoyed these 9 Tips to Bottle Home Brew.
Keep these tips in mine and also follow what I teach here about bottling and you will have a perfect carbonation every time.
If you have any questions at all be sure to reach out to me in the comment section below. I am always happy to help fellow homebrewers.
If you are new to the hobby I have put together a free guide on how to homebrew, you can check that guide out here. It covers everything and anything I could think of that would help you get started making some great home-brew right out of the gates.
Cheers… Big Robb is out!
All great tips, good to have them all as a single list. I definitely agree about cleaning the bottles, and sanitising them, and using a bottle brush to make sure the bottles are really properly clean. I haven’t tried Carbonation Drop – I’ve only used dextrose before. I find swing top bottles quite difficult to get 100% clean and sanitized – I quite like using the capping machine, but only ever make very small batches so I’ll bear in mind that you can get screw top bottles. Thanks for another informative article.
Cheers!!
This is really amazing. I have always heard my friend complain about howbhe would love to bottle his brew but do not know how to go about it. From what i have read here, its seem like a whole lot of easy thing to do on your own. I’ll inform him about this post so he can learn from it. However me on the other hand have no idea how to make a brew. Any information on where i can learn it or link i can check it on?
Hi Dane, thanks for dropping by. To get started home brewing you can check out my free guide here:
https://makebeereasy.com/how-to-home-brew-the-complete-guide/
So that’s why there’s always an air gap! I tried making beer with my brother before this which is a long while back and I never got into the case of the exploding beer bottles. The taste was fine but man, I forgot about the CO2 build up. Out of curiosity, is there a set rule for how much air gap should we leave before closing?
Hi Riaz, yes there are calculations but to me that is going overboard. I keep things simple and easy and hence why I call this site Make Beer Easy. An inch is more then enough space in the bottle and will work great in pretty much all cases. Cheers
Hi Big Robb, Enjoyed your post on how to bottle home made beer. It sounds very interesting. I didn’t realize how involved it was. I understand that the sanitizing would be very important. It surprised me that a dark place was needed, but it makes sense when you are using yeast. Also, the capping is interesting too. Don’t drink beer, but, good luck with your site. Very detailed and excellent help for anyone just starting out making it. My son has a friend who is doing this as a business and I guess it is very lucrative. Thanks for sharing, Deanna
Thanks Deanna! I owned a micro-brewery also. its an adventure for sure! 🙂 Cheers
Hi Big Robb,
I bouhgt my brother a home brewing kit for his brithday. We’ve started brewing a few batches for family events and parties etc. as a hobby. I personally much prefer bottled beer, plus a couple, of friends have mentioned they wouldn’t mind being able to buy a few bottles so can hopefully make some dollar back on the expense of bottling.
Your steps are great for us to follow, any advice on where we can buy the best types of bottles though?
Hey Nate… thanks for the message. I would caution you look into your local regulations before selling beer.
In regards to bottling here is a post that will help you out: Bottling Home Brew Beer – Everything You Need to Know
I have a friend that brews his own beer and he has gotten really good at it. It’s awesome for people to be able to do this at home. One thing he plays around with a lot is different ingredients, like different types of wheat or barley and I believe he even said he soaks his brew in wood chips at times, but I may have misunderstood him.
What do you think are the best ingredients for a newbie to start out with who has never done this before or do you have an article that goes over this?
Hi Rick, to get started I would recommend starting with Beer Kits, as it teaches you the basics. Here is a post that will help you get rolling: Home Brew Kits
Great tips about how to bottle home beer. The great beer comes from the work of creativity that comes from science. Filling beer to the brim can cause the bottle to explode without notice. I also want to be a great Brewer. This tips is enough to guide on how to practice brew bottling.