
There has never been a beer that has caused so much noise and fanfare in the craft beer world as the IPA (India Pale Ale). People simply go crazy over this brew. If you have ever wanted to learn how to homebrew an IPA for yourself you have landed in the right place!
There is no better feeling than having your own delicious homebrew on tap and being able to share a pint or 10 of it with people who drop in for a visit; this is especially true for an IPA. If you make a good one (and you will if you do as I show you) people are going to absolutely love it and will start looking at you like you are a serious brewmaster.
Before we jump into making an IPA there are a few things that you need to understand first… 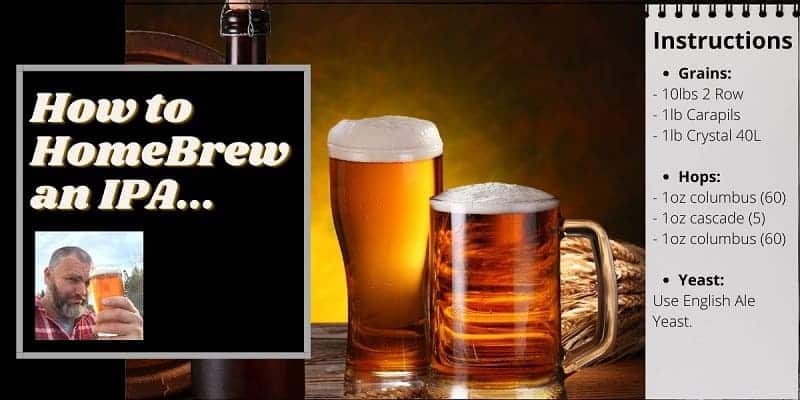
First What Exactly is an IPA?
There are so many different looking, smelling & tasting beers and recipes out there that claim to be an IPA but are so vastly different from each other. How can so many beers that are so different all claim to be the same style?
This has caused a ton of confusion about what an IPA really is.
Every time you turn around there seems to be a new style of IPA. British, American, Hazy, Cloudy, West Coast, East Coast, NEIPA, Double, Session, Dank, Juicy the list goes on and on…
Nowadays IPA’s come in every possible color you can think of, some are clear, some are cloudy, their aromas are all over the board and they range from a low 4% ABV all the way up to 8-9% + ABV. Every week the newest fad in IPA’s seems to hit the market.
There seems to be an ongoing competition between brewers to see who can have the cloudiest, the most bitter or the juiciest. When you are trying to figure out how to homebrew one for yourself it can become downright confusing.
To get a really good understanding of how to homebrew one for yourself it is important to understand how this beer originated and how it changed over time to become what it is today…
The History of the India Pale Ale
Most people have heard the tale that the India Pale Ale originally came into being as a pale ale that was brewed using a ton of hops in order to preserve the beer as it was being shipped to the British troops stationed in India.
Hops are a preservative; which prevented the beer from spoiling during the long ocean voyage. This story is not a 100% historically accurate but close enough.
I surmise that because the hops added a lot more bitterness to the pale ale that the brewmasters of the day added more malt to offset the bitterness which in turn made for a beer with a higher alcohol content than a typical pale ale. Hence the birth of the IPA, hooppier, more bitter and a higher alcohol content.
An interesting fact is that the original British IPA was much hoppier than what it is now. In fact it most likely resembled the modern day hoppy IPAs brewed on this side of the pond in North America. Back than it was brewed with primarily a pale malt and very little specialty malts and was loaded with hops. I’ve read they were brewed using 3-5 ounces of hops per gallon.
However over time the British IPA transformed into what it is today. Whether this was a result of the tax that was imposed on hops or whether people just started liking more balanced pale ale style beers I can not tell you. But regardless overtime the British IPA became less hoppy and more balanced. This style is actually my favorite style of India Pale Ale.
The Birth of the American IPA
Enter stage left America! There is no question that American breweries are the reason for what we presently see going on with IPA’s.
The very first one brewed in America was the Ballantine IPA. It is responsible for introducing those of us on this side of the pond to this substantial ale. Although its make up has changed over the years, it originally was a very hoppy beer with a strong aroma, an ABV of 7.5% and 60 IBU’s of bitterness. It was brewed for approximately 100 years and without a doubt sparked the IPA craze we now see happening. Countless brewers have tried to replicate it.
Eventually what happened was a new hop came along that took the brewing world by storm and inspired a whole new breed of IPA’s. I am of course talking about Cascade. Breweries such as Anchor Brewing, Sierra Nevada and Harpoon are just a few examples of breweries who used this hop and revolutionized the craft beer industry.
East Coast vs West Coast IPA’s
For many years there was a stark contrast between an IPA brewed on the West Coast versus one brewed on the East Coast.
Originally the East Coast IPA was more like the later version of it’s British cousin. It had a decent amount of crystal malt in it, and would be considered more balanced as the malt evened out the bitterness from the hops.
Whereas the West Coast style was more like the earlier version of the British style, being much hoppier and bitter, it also did not use much if any crystal malt and as a result was a much paler in color beer.
The basic rule of thumb was in the West keep it pale in color and bitter the heck out of it and in the East the rule was be sure to use crystal malt to add color and lower the bitterness.
Nowadays these rules do not apply and you will find East Coast IPA’s in the West and vice versa and all kinds of variations of the two all over the place.
And of course than along came the NEIPA which caused a whole new surge in popularity, loved for its low bitterness, soft mouthfeel and juicy aroma and taste.
Now let’s get into the characteristics of this style of homebrew. A lot of what we are going to look at is obviously going to be dependent on what style you want to homebrew. You will see that by simply changing the recipe just a little you can create a whole different style of IPA…
What it Should Look Like (Appearance)
If you are brewing a West Coast IPA it would be straw like in color due to the lack of crystal malts. East Coast & British is going to have more of a copper or bronze like color. It would usually be clear unless you are looking to brew an NEIPA or a hazy/juicy beer and if so you will dry hop it big time resulting in it having a cloudy appearance.
The head is typically off-white to white in color. There is usually not a large head present with this beer due to the oils from the hops. You can counter this somewhat by adding wheat or Carapils in the brewing process.
What it’s Mouthfeel Should Be Like
East Coast and British versions will all typically have a smoother fuller mouthfeel. Although not overly, call it medium light to medium.
NEIPA will have more of a medium softer and smoother full mouthfeel.
West Coast is still going to be smooth but it is not going to have as much of the full mouthfeel due to not using the same amount of specialty malts.
The carbonation in most IPA’s is typically medium to medium high. And of course as would be expected you will get that warming feeling from the versions that have a higher ABV.
What it Should Smell Like (Aroma)
Aroma is going to be all over the place and it will be determined by the hops that you use while homebrewing it. There will not be much if any of a malt aroma with any of the styles.
NEIPA is going to have an Aroma that really shines through. This is due to the hops that are used and also the later hop additions especially the dry hopping. The smell will be tropical, fruity, citrusy, almost like an orange grove.
West Coast IPA is not going to have as much of an aroma but it will still have a noticeable one which will smell more like grapefruit and/or pine. This is because of the hops used and when they are used.
More hops are used at the start of the brewing process in order to achieve the bitterness. Usually the equivalent amount is used later in the brewing process for aroma purposes, but nowhere near as much as what is used in the later stages of brewing an NEIPA.
The East Coast IPA’s aroma can really be all over the place, again it will depend on the hops used. There could be a fruity or citrusy smell, nowhere near as pronounced as a NEIPA; or there could be a floral, pine or even freshly cut grass smell.
The aroma of a British IPA is going to come from using British hops so it is going to be significantly different from any of the American versions. Typically you will get a spicy, floral or perhaps a peppery type smell. You might even catch a slight malt aroma such as caramel or toffee.
How it Should Taste (Flavor)
British and East Coast IPA’s will have a balanced flavor due to the malt which evens out the bitterness from the hops. You will taste both the malt and the bitterness but neither will be overpowering.
West Coast versions are going to taste bitter and will also have either a pine or a grapefruit or lemon peel taste. These beers are brewed to taste bitter so you should expect that.
The NEIPA or Hazy style are going to have a very high flavor to them, the flavor will be in line with the aroma and you can expect them to have a tropical, fruity and citrusy taste.
Ingredients
OK let’s get ready to homebrew this bad boy. The first step is of course you need to have equipment, I am assuming you do. If not you can check out the type of system I brew on and recommend here.
The next step is to get your ingredients in order. I am going to provide you with a recipe further down in this post but first let’s take a quick look at which ingredients to use when brewing each style of IPA…
Grains to Use
If you are making a NEIPA than American 2 Row will be your base grain making up approximately 80 – 90% of your base grain. You will use some crystal or caramel specialty malt to add color and body. The remaining portion of your grain bill will be made up of typically Carapils (dextrin), wheat, flaked oats or barley to add more body to the beer.
If you are brewing a traditional American or British IPA you want more of the malt taste to shine through, so you could use a British pale malt like Maris Otter but American 2 row works also. You will use crystal malt for coloring and adding body. Vienna and Munich malt can also be added to increase the malt character. I like to also add some Carapils (dextrine) for more body and head retention.
When it comes to the West Coast IPA many will simply use a base malt like 2 row. I recommend adding a small amount of a light crystal malt as well as some Carapils (dextrin) to add a little body, if not you are going to have a very thin beer.
Hops to Use
The hops you use are really up to you and what aroma and flavor you are going for.
NEIPA’s typically use the tropical fruity hops such as Citra, Mosaic, and Galaxy. They are added later in the brewing process during the whirlpool and dry hopping stages.
British IPA’s you would use British hops such as Target, East Kent Golding and Fuggles that will give you more of the floral, earthy tones.
West Coast you can use what you like for flavor and aroma, however you want to add a fair amount of bittering hops at the start of the boil to get that high bitterness they are known for. Typically the American C hops are used (Cascade, Columbus, Chinook, Centennial).
Yeast to Use
A traditional American IPA I would recommend an American yeast such as US-05.
A British IPA clearly uses an English yeast strain such as S-04 or Nottingham Ale yeast.
NEIPA’s are surprisingly made a lot of the time using an English yeast strain, there are also now yeasts made explicitly for NEIPA’s.
When brewing a West Coast any American yeast will work just fine.
India Pale Ale Recipe
Finally the time has come to actually make an IPA. The IPA recipe I am going to provide you with was one of the top sellers in my brew pub.
I call it The Cousin Jimmy.
Very simple reason for that is I have a cousin named Jimmy he has never brewed a beer in his life, but for some reason as I was learning to brew he figured it was his job to critic my beers, this one was the first one he really liked, so in honor of that monumental moment I decided to name it after him.
It would be considered more of a traditional American IPA recipe. The bitterness, maltiness and hop aroma and flavor are all nicely balanced.
I am eventually going to do posts on how to homebrew a West Coast IPA, NEIPA & a British IPA. When I do I will link the recipes for them to this post. However in the meantime it is a very simple thing to modify the following IPA recipe to become any of those styles of beer.
The following are a few tips to modify this recipe to make the style of IPA you want to…
How to Homebrew a West Coast IPA
Not much need to adjust the grain bill. You might either remove the crystal malt all together or lower the lovibond.down from 45 L to between 10 – 30 L.
The amount of hops is where you are going to switch things up. I would stick with the same type of hops, or adding any of the C hops such as Cascade, Centennial, Columbus and Chinook will work well. The key here is to up the amount of hops used to get the bitterness you will be looking for. Add anywhere from 1 to 3 oz per gallon of beer.
Split the amount between your bittering additions and the rest of the additions. For bittering I would suggest additions at 60, 45, and 15 minutes. Then remaining additions at flame out, whirlpool and dry hopping.
So if you are using 12 oz of hops total (which is a lot but not uncommon, feel free to dial it down if you like); each addition would use 2 oz for 6 additions.
Keep the same yeast i.e. US-05.
How to Homebrew a NEIPA
For the grain bill you can continue to use 2 Row as the base or switch it up and use either Golden Promise or Maris Otter. The base grain should be 80 – 100% of the total grain bill.
Next you could add some flaked oats and/or flaked wheat for a fuller softer mouth feel, no more than 10 – 20% of the grain bill.
You could also lower the lovibond of the Crystal malt to down around 20-30 L, do not use much, keep it around 3-5% of the grain bill. I would recommend that you continue to use Carapils (dextrine) but drop it to 2-5% of the grain bill.
Again the hops is where things really get switched up. You will want to use hops known for their fruitiness, tropical and juicy like tendencies. Citra, Mosaic, Galaxy and Vic Secret work great in an NEIPA.
To keep things simple go with only 3 hop additions:
1) A small amount for a little bittering at the start of the boil, Citra is a great choice, keep it to about 15 IBU’s.
2) A whirlpool addition of 3-5 ounces. Whirlpooling is done after the boil has completed. Aim to drop your temperature to 170 degrees Fahrenheit. If your brewing system will allow you to keep it at that temperature for 20-30 minutes; if not it will still work fine. Add your hops and give the wort a really good stir to create a whirlpool effect.
3) When fermentation is finished, dry hop your beer for 3 to 4 days. Use at least 6 ounces of hops, some homebrewers use as much as 12 ounces but that gets expensive.
For yeast, you will want to use an English yeast strain, S-04 or Nottingham Ale yeast are my two favorites.
How to Homebrew a British IPA
You don’t have to change the following recipe much to convert it into a British IPA recipe. For the grain bill instead of using 2 row use Maris Otter.
Now simply change out the hops to English hops. Use Target instead of Columbus at the start of the boil for bittering. And replace the last two hop additions with either East Kent East Kent Golding or Fuggles.
For the yeast, you will of course again use an English strain.
The Cousin Jimmy IPA
And here you go my friend, the long awaited recipe…
- SRM: 7.87
- Target OG: 1.061
- Target FG: 1.010
- ABV: 6.5%
- IBU: 74.39
- Pre Boil Volume: 7 Gallons
- Fermenter Volume: 5.2 Gallons
- Brewhouse efficiency: 70%
Grains
- 10lbs 2 Row
- 1lb Carapils/Dextrine
- 1lb Crystal 40L
Hops
- 1oz Columbus (60 min)
- 1oz Cascade (5 min)
- 1 oz Columbus (5 min)
Yeast
Any American ale yeast. I prefer US-05.
There you have it my friend, it’s a delicious beer that I know you are going to enjoy.
Need Ingredients? If you are going to brew it up, do me a favor and consider ordering your ingredients from the vendors here.
If you buy from those vendors they give me a small referral fee (at no cost to you) for sending you to them. It helps support this site and Big Robb appreciates it! Cheers.
Instructions
Mash at 150 degrees Fahrenheit
Boil for 60 mins
Additional Resources
So clearly this recipe is an all grain recipe. If you have never brewed an all grain recipe before I personally homebrew on what is called an All-In-One brewing system.
These systems are the most cost effective way to brew, they make incredible beer, are easy to use and the clean up at the end of the day is so much simpler.
You can learn about how they work here on this post.
If you would like to brew on one yourself this post will show you which are the best systems to buy.
And lastly if you need help on any of the aspects of homebrewing, such as cleaning equipment, mashing, fermenting, filtering your beer, cold crashing, etc I have put together “how to” guides that cover all aspects of brewing. You can see them all on this page here: Guides to Homebrewing
And there you have it my friend, you now know actually more than you need to know in regard to how to homebrew an IPA. So get your ingredients and get brewing…
If you enjoyed this post or have any questions let me know in the comment section below!
Oh yeah…
Big Robb is out!
