If you are a fan of the ultra hoppy IPA styles then you owe a debt of gratitude to the West Coast IPA that started this modern-day hop revolution that we are in. In this post, we are going to provide you with a West Coast IPA recipe, an overview of the ingredients that go into making it, as well as providing you with some tips to help you brew one for yourself.
What is a West Coast IPA
Known for its large hop characteristics the West Coast IPA first gained popularity in the 1990s when it burst onto the beer scene with its high bitterness combined with a medium hop flavored taste along with large hop aromas that are a unique blend of Pine, Citrus, and Tropical Fruits.
Prior to the rise in popularity of the cloudy and hazy beers, this style of IPA was the benchmark of what an IPA should look like with its crystal clear and light orange/golden color.
It has its origins in the British IPA but with an American twist of being bigger and bolder in both alcohol content, bitterness, and hop aroma. Although not as dry as its British predecessor due to its use of crystal malt, its bitterness level far exceeds it, coming in with some versions exceeding 100 IBUs.
When creating a recipe for this beer style it can be a challenge to achieve and balance the required bitterness, crisp and dry profile along with its significant hop aroma and taste and light malt character that allows the hops to shine through.
Let’s take a look at the grain bill to start…
Choosing Your Base Grains
Save
In most cases, you will find that one of the following 3 base grains are used or even a combination of them:
2-Row
Pilsner
Golden Promise
2 Row would be the most used of the three due to availability, price, and popularity among homebrewers and craft brewers alike. It creates a nice clean flavor in the beer and has high diastatic powers which you want with this style.
Pilsner is often used if you are looking to brew an ultra-clear IPA. In many cases, Pilsner will be combined with 2 Row at anywhere from 20 – 50% of the grain bill. If you use Pilsner then make sure you do a 90 minute boil in order to prevent the DMS off-flavor.
Golden Promise would be for those of us who still like our IPA’s to lean towards the malt flavor that you would expect in a British IPA. Golden Promise will allow for the clean and crisp taste this style is known for but also provides for that slight biscuity or bready malt flavor as well. This helps to just slightly balance out the hop profile, creating a more balanced IPA without losing the characteristics this style is known for.
Choosing Your Specialty Grains
One of the big mistakes that novice brewers make with any beer recipe is thinking they need to complicate it and add all sorts of ingredients to the pot in order to make that perfect beer. The truth is that in most cases simplicity is the secret to making a great-tasting beer. When it comes to the grain bill, in particular its specialty grains, a West Coast IPA recipe might just be the perfect example of this.
All you want from your specialty grains with this beer style is a little bit to help with the head formation and add a slight caramel flavor.
For head formation, around 5% of either Carapils (dextrin) or Wheat Malt will do the trick. To get the slight caramel or toffee flavor, you can add anywhere from 1 – 5% Crystal Malt. Keep the Crystal Malts within the 10 – 45 Lovidbond range. Doing so will give you the slight sweetness we are looking for while balancing the malt and hop profile nicely.
Adding Dextrose
In order to ensure that your beer has a dry and clean taste and finish to it, you can add some dextrose to the boil. Dextrose is 100% fermentable and as a result, it will dry out the finish in hop-forward beers like this style. As long as you keep the dextrose to under 10% it will dry the beer out nicely and you will not get the ill effects of ethanol-like taste that it provides when used in greater quantities.
Choosing Your Hops
Hops are the name of the game with a West Coast IPA and when you look at some recipes you will notice that there are a serious amount of hops used. It is not an inexpensive beer to brew, you brew it because you love the style and the creativity that goes into designing your own.
When it comes to your hop selection the sky’s the limit. Have fun with it. You should be aiming to design a comprehensive hop profile that blends the finest attributes from the various hop varieties that you choose.
Mix and match the hops to create the taste and aroma profile you desire. You could have a grapefruit tropical fruit mixture by combining Cascade with Citra for example. There are numerous combinations you can make, do some research into which ones will achieve the profile you want.
Hops are added many times throughout the brewing process. Bittering hops should be added at the very least 3 times, at the start of the boil, the 30 min, and 15 min marks. You can even do first wort hoppings where you add bittering hops to your kettle during the lautering. Many brewers will also include many late hop additions for flavor and aroma, especially during flameout and whirlpooling.
A significant amount of dry hops are used in a West Coast IPA, for a 5-gallon batch you will see some recipes calling for anywhere from 5 – 8 ounces of dry hops to be added for a maximum of 5 – 7 days.
Choosing Your Yeast
Yeast plays a much larger role in the flavor profile of a beer than most people understand so choose your yeast with care. All of us have a favorite yeast or two we enjoy so feel free to use yours. It is recommended to use a highly attenuating yeast that will provide a clean fermentation.
US-05 is always a great choice for dry yeast and Wyeast and White Labs also both have great options for this style of beer. When you pitch your yeast be sure to give it a good stir in order to oxygenate it and get the yeast off to a great start.
Brewing Tips
If you brew your beer following what we have just covered you are going to create a nice looking, tasting, and smelling West Coast IPA. The 3 following tips will allow you to take it just one step further.
Keep Your Mash Temperature Low – Shot for around 148 – 150 degrees Fahrenheit when mashing. This will allow for a very dry profile that this style calls for. When you mash at lower temperatures like this it makes for a more fermentable wort where more of the sugars are broken down and are able to be fermented out.
Adjust the PH Level – You do not have to get into all of the aspects of water chemistry and adjusting your brewing water, however making sure your PH is inline is a step all brewers should be using if they are looking to make quality beer.
The recommended PH range is between 5.2 – 5.6. It is easy to check with a PH meter and you can adjust it with gypsum or lactic acid as needed. It takes no time to do this and it is worth the effort when it comes to your finished product.
Clear Your Beer – Unlike its cousin, the NEIPA, a West Coast is supposed to be a clean, crisp, and clear-looking beer. There are numerous techniques you can use to produce a clear beer; however, 3 simple and straightforward methods are to use whirlfloc in the boil at the 15 – 20 min mark, cold crash your beer for 2 – 3 days, and add a fining agent such as gelatin either halfway through cold crashing or directly to the keg. Doing these 3 things will result in a crystal clear beer you can be proud of.
Frequently Asked Questions
What is the difference between a West Coast IPA and a NEIPA – There are a few differences, the first you will notice is in the appearance of the beers. A NEIPA is intended to look cloudy or hazy where the West Coast is bright and clear. Due to its hazy look, the NEIPA will also have a different mouth feel which could be considered silkier, whereas a West Coast is more crisp and sharper tasting.
In regards to the hop characteristics with a NEIPA, they will be juicier which means they will have more of a Tropical fruit taste and smell to them. Where the West Coast IPA is going to have more of the grapefruit and pine characteristics.
How long should I ferment this beer – The standard 2 weeks in the fermenter, followed by a 2-day cold crash is what I recommend. The main thing to consider here is the dry hopping, you only want to do so for a max of 5 – 7 days so if you are fermenting for 2 weeks, dry hop on day 7 or 9.
How soon should I drink a West Coast IPA – With any IPA the sooner the better is always the answer. Some beers do better when allowed to condition for months, IPA’s are not one of these beers.
In order to capture the flavors you intended for this beer you will want to drink them as close to when they have been bottled or kegged as possible. The longer you wait the more they start to lose their flavor and aroma characteristics.
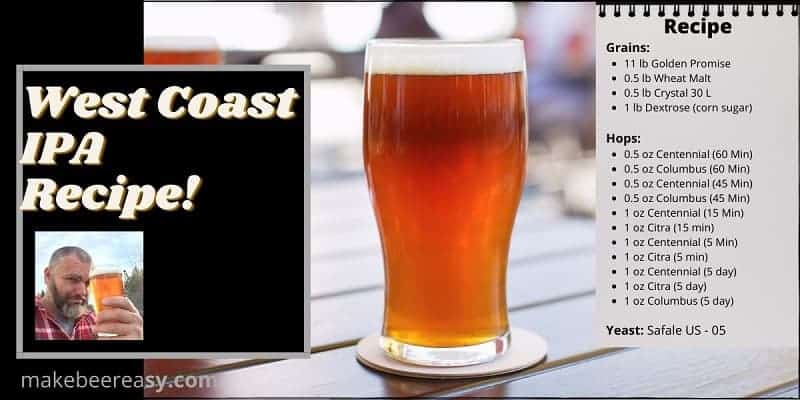
West Coast IPA Recipe
The following is a recipe you can try for yourself, feel free to mix and match any of the ingredients keeping in mind the guidelines we covered in this post.
ABV – 7.3%
IBU – 100 +
Original Gravity – 1.067
Final Gravity – 1.011
Fermentables
11 lb Golden Promise
0.5 lb Wheat Malt
0.5 lb Crystal 30 L
1 lb Dextrose (corn sugar)
Hop Additions
0.5 oz Centennial (60 Min)
0.5 oz Columbus (60 Min)
0.5 oz Centennial (45 Min)
0.5 oz Columbus (45 Min)
1 oz Centennial (15 Min)
1 oz Citra (15 min)
1 oz Centennial (5 Min)
1 oz Citra (5 min)
1 oz Centennial (5 day)
1 oz Citra (5 day)
1 oz Columbus (5 day)
Yeast
Fermentis – Safale – US – 05 or any highly attenuating American ale yeast
Instructions
Mash for 60 minutes at 150 degrees Fahrenheit
Boil for 60 minutes adding hops as per additions listed
Add 1 tsp of gelatin to the fermenter after 24 hours of the cold crash
Keg or bottle.
There you have it, my friend. Let me know if you brew up this recipe and be sure to tell us in the comments what you think of it. Also, feel free to ask any questions you have and I will be sure to help you out.
If you have brewed this style of beer before let us know what your favorite grain bill and hop selection are for your recipe.
Cheer, Big Robb is Out!
Save
P.S. For a limited time I am giving away the recipes to my 5 best-selling beers from my brewpub. Sign up to get your copy of them on the side of the blog or the bottom if you are on a smart device. Enjoy!